You will need three “keys” to link a Shopify web shop: an API key, a secret API key and a secret webhook key.
Attention
Shopify's way of integrating external software was changed. The "private apps" of old were replaced with "custom apps." The way they should be configured was also changed.
Create API keys
The API link allows Webship to communicate with your Shopify webshop. This includes requesting orders and product information, adjusting order statuses, etc. Below we will provide a step-by-step plan to link a Shopify web shop to Webship Online.
- Log into your Shopify account
- Navigate to “Apps” in the left menu
- Click the text link “manage private apps” at the very bottom of the page
- Press “Create a new private app”
- Complete the fields as follows:
- Private app name: Webship Online
- Emergency developer email: support@webship.online
- The following API Permissions should be given the status “Read and write”:
- Orders
- Products
- Webhook API version: latest
- Click “Save”

- You will receive the first two keys you need in our app: the “API key” and “Password” (=secret key)
- Open Webship Online in a new tab or window
- Navigate to “Shops” and add a new shop
- Assign a name to the shop and select “Online shop”. Then select ‘Shopify’.
- Under ‘API configuration’, enter the two generated keys and the initial ‘myshopify.com’ url of your shop.
This url can be retrieved by entering your current url in whatsmyshopifyurl.- URL: https://my-shop.myshopify.com/
- Key: the shopify API key (1 in the picture below)
- Secret: the shopify API access token (2 in the picture below)

Add webhooks
Webhooks make sure that Shopify updates our application of any changes in orders in real time. Without webhooks, Webship Online will only receive the changes at fixed times and not in real time.
First webhook: order updated
- Go back to “Shopify” to retrieve the third and final key
- Click the “Settings” cogwheel at the bottom left
- Click “notifications”
- Scroll down the page and select “Create webhook”
- Complete the fields as follows:
- Event: Order update
- Format: JSON
- URL: https://app.webship.online/webhooks/shopify
- Webhook API version: latest
- Click “Save webhook”
- After saving, you will receive the third key “All your webhooks will be signed with: XXXXXXXXXXXXXX”
- Copy this key and switch back to Webship Online
- Under “Webhooks configuration”, enter this key under “Secret” and enter your Shopify domain name under “Origin”:

- Determine which orders you want to receive in Webship Online by using the status filter or an advanced filter. The most common setting is payment status “paid” and fulfilment status “unshipped”.
- Save this configuration in Webship Online
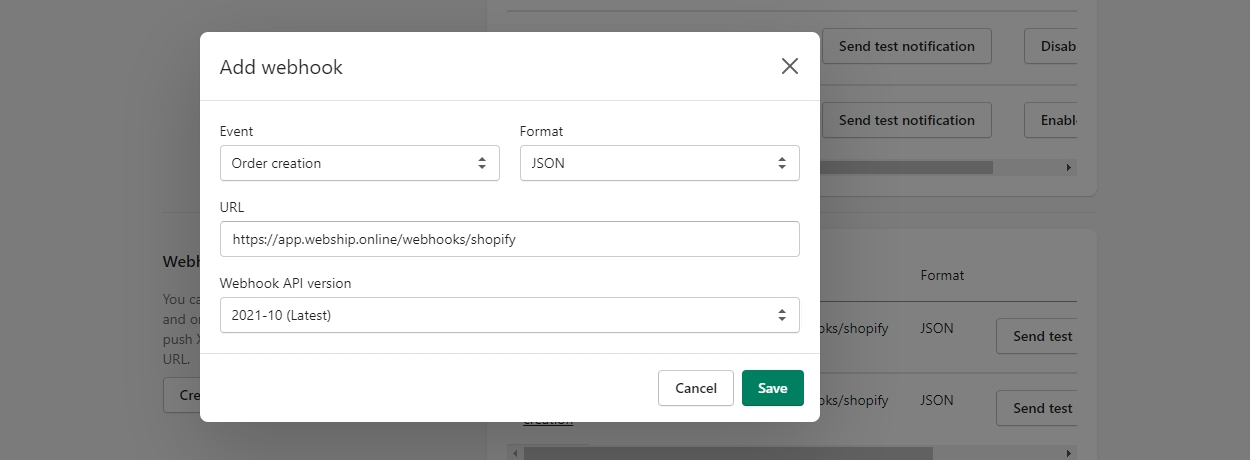
Second webhook: order created
- Return to “Shopify”
- Click the “Settings” cogwheel at the bottom left
- Click “notifications”
- Scroll down the page and select “Create webhook”
- Complete the fields as follows:
- Event: Order creation
- Format: JSON
- URL: https://app.webship.online/webhooks/shopify
- Webhook API version: latest
- Click “Save webhook”